Archery Blog
Nocking Points and D-Loops: The String Interface That Governs Accuracy
Jun
Everything an arrow does downrange begins at a junction smaller than your fingernail: the spot where the nock snaps onto the string. Get that interface right and the bow rewards you with arrows that group tight and behave predictably. Get it wrong by a couple of millimeters and you chase porpoising tears, erratic vertical impacts, and a tune that never quite settles. Two components govern this junction on a modern compound: the nocking point and the D-loop. They are often discussed separately, but they are really one system, and understanding how they cooperate is what separates a bow that shoots clean from one that fights you.
What the Nocking Point Actually Does
The nocking point is the fixed reference on your bowstring that determines exactly where the arrow sits vertically. Without it, the nock could slide anywhere along the string, and every shot would launch the arrow at a slightly different angle. The nocking point removes that variable. It establishes one repeatable height so the arrow leaves the rest at the same attitude every single time you draw.
That height is measured relative to the arrow rest and described as nock height or, when expressed as an angle, nock point above level. A typical compound starting point places the arrow somewhere between level (90 degrees to the string) and about an eighth of an inch high, but the exact figure is something you confirm through tuning rather than copy from a chart. The point is that the nocking point makes the measurement fixed. Once it is set and verified, it does not wander.
On recurve and traditional setups the nocking point is usually a small brass clamp-on collar or a band of tied dental floss/serving thread crimped onto the serving. On a compound shot with a mechanical release, that same job is absorbed into the D-loop — and that is where the two components stop being separate ideas and become a single connected piece of hardware.

Why the D-Loop Changed the Junction
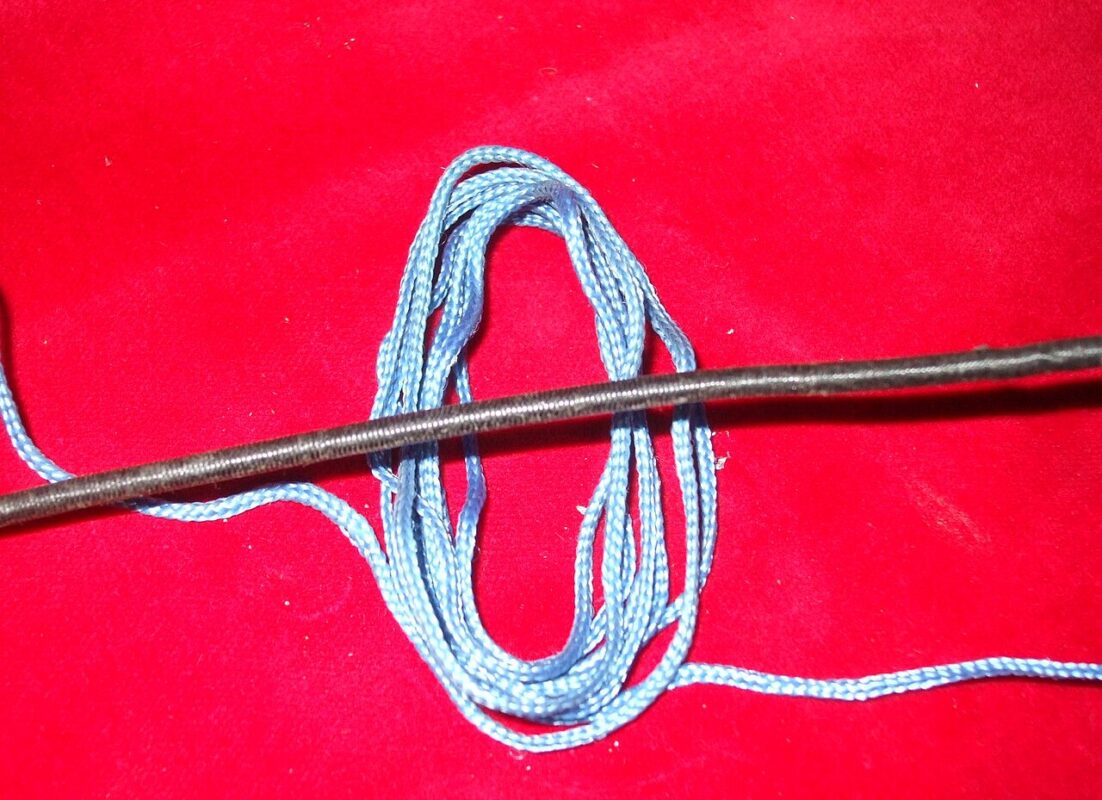
Before release aids became standard, fingers pulled the string directly, and the arrow nock was the contact point you drew with. A mechanical release changed the geometry entirely. You no longer want to grab the string at the nock — you want to pull from a point that keeps the release hooks clear of the arrow and applies force evenly above and below it. The D-loop solves this. It is a short loop of cord, tied to the serving above and below the arrow, that gives your release something to bite while leaving the nock free.
Here is the part that trips people up: on a D-loop bow, the loop itself becomes the nocking point system. The two tie-on knots that anchor the loop to the serving are what pin the arrow’s vertical position. The bottom knot sits just under the nock, the top knot just above it, and together they cradle the arrow exactly where you set them. So when you adjust nock height on a compound, you are usually moving those D-loop knots, not adding a separate brass nock. The loop and the nocking point are the same hardware doing two jobs at once.
This is why a poorly tied loop wrecks a tune. If the knots creep under shooting tension, your nocking point moves with them, and a bow you spent an afternoon dialing in starts throwing fliers for no obvious reason.
Nock Fit: The Variable Nobody Measures First
Before you obsess over height, check how the nock grips the string. Nock fit describes how tightly the arrow’s nock snaps onto the serving, and it sits upstream of everything else at this junction. Too tight and the arrow hangs on the string a fraction too long at release, dragging the rear end and inducing vertical tears. Too loose and the arrow can fall off the string or release inconsistently.
The classic test costs nothing. Nock an arrow on a horizontally held bow, then tap the string lightly an inch or two from the nock. A correctly fitted nock pops off cleanly with a firm tap; a too-tight nock clings; a too-loose nock falls off on its own. The cure is matching nock size to serving diameter — sometimes by changing nocks, sometimes by re-serving the string with thicker or thinner material. Many archers fight a vertical-tuning gremlin for weeks when the real culprit was a nock that pinched the serving all along.
If you are setting up a fresh string or replacing a chewed-up serving, a set of nocking pliers and a spool of serving material will pay for themselves over a season. The pliers crimp brass nocks cleanly on finger bows and help you snug serving without nicking the string.
Shop Archery Nocking Pliers on Amazon →
Setting Nock Height So It Stays Put
With nock fit confirmed, height is the next lever. The goal is to launch the arrow level — or with a hair of upward bias — so the shaft clears the rest without the back end kicking up or down. A bow square is the tool that makes this measurable instead of a guess. Clip it to the string, rest it on the arrow shelf, and read where the bottom of the arrow falls relative to the rest. That reading becomes your baseline, and every adjustment afterward is a known quantity rather than a vibe.
On a D-loop bow, raising or lowering nock height means retying or shifting the loop knots a hair. Because that is fiddly, smart archers set height once during initial tuning and then verify it with a paper test or bare-shaft test rather than nudging it blindly. If your paper tear shows the nock end of the arrow flying high (a tear with the tail above the point), the arrow is launching nock-high and you lower the nocking point slightly. A nock-low tear calls for the opposite. The diagnosis is the same logic finger archers have used for decades; the D-loop just changes which knot you move.
Shop Archery Bow Squares on Amazon →
Nock Pinch: The Quiet Accuracy Killer
One failure mode deserves its own section because it hides so well. Nock pinch happens when the nocking points — or the D-loop knots — sit too close together and squeeze the nock from both ends as the string is drawn. As the bowstring bends around your fingers or the loop deforms under tension, the gap between the top and bottom anchor narrows, and the nock gets gripped. The result is an arrow that leaves the string with a tiny upward flick, and on the target it shows up as unexplained vertical scatter.
The fix is deliberate clearance. On a D-loop, you tie the loop so there is a sliver of breathing room around the nock rather than clamping it tight. On a finger bow with twin brass nocks, you leave a nock’s-width of space plus a touch more. The arrow should be located, not crushed. Anytime your groups stack horizontally but spray vertically with no obvious form fault, suspect pinch before you suspect yourself.
Materials Matter More Than They Look
D-loop cord is not generic rope. Purpose-made D-loop material is a stiff, heat-resistant polyester rope sized to hold a knot under repeated shock without creeping. Cheap substitutes stretch, and a loop that stretches is a nocking point that moves — the exact thing you tied it to prevent. When you cut a loop, you singe each end into a small mushroom-shaped bead so the knot cannot pull through, and you set the knots by drawing the bow a few times before trusting the position.
Serving material matters just as much on the string side. The serving under your nocking area takes the brunt of every shot, and when it separates or wears thin, both your nock fit and your nock height shift at once. Inspecting that center serving is part of routine bow care, not a once-a-year afterthought.
Shop D-Loop Rope Material on Amazon →
How the Pieces Work as One System
Step back and the relationship becomes clear. The nock fit decides how cleanly the arrow lets go. The nocking point — whether a brass collar or a pair of D-loop knots — decides where the arrow sits and at what angle it launches. The D-loop decides where your release pulls from and, on a compound, doubles as that nocking point. Clearance between the anchors decides whether pinch sneaks in. Change any one and you have likely changed another, which is why tuning this junction is an iterative loop rather than a single adjustment.
The practical workflow runs in order: confirm nock fit first, tie or set the D-loop with proper clearance second, establish nock height with a bow square third, then verify the whole thing with paper or bare-shaft tuning. Skip a step and you will eventually circle back to it anyway, usually after an afternoon of confused troubleshooting. Respect the order and the junction becomes the most reliable part of your bow instead of its most mysterious.

None of this is glamorous. It is cord, brass, and a few millimeters of serving thread. But the arrow does not care how small the parts are — it only knows where it sat and how cleanly it left. Master that handshake between string and nock, and consistency stops being luck and starts being something you built on purpose.
Sources
- Archery 360 — beginner and tuning guides
- World Archery — equipment and technique references
- Wikipedia — Bow and arrow
Browse archery bows, arrows, and accessories at the Archery Supplier shop →