
Archery Blog
Bowhunting Shot Placement: 5 Vital Zones Every Hunter Must Know
Jul
Bowhunting has a problem nobody talks about at the range. According to the National Deer Association, wounding rates in bowhunting run significantly higher than in firearm hunting, with some estimates putting non-recovered deer at 10–20% of animals shot. Arrows don’t carry the kinetic energy to punch through heavy shoulder bone the way a rifle round does, which means angle, aim point, and timing matter far more than in any other form of hunting. Get the shot right and you’ll find your deer inside 100 yards. Get it wrong and you might never find it at all.
The Vitals: What You’re Actually Aiming For
Every experienced bowhunter knows the “boiler room” — the chest cavity where the heart, lungs, and liver sit packed together just behind the deer’s front legs. The lungs alone span roughly 8–9 inches in diameter on a mature whitetail. That’s a dinner-plate-sized target, which is exactly why lung hits produce the fastest, most consistent recoveries.
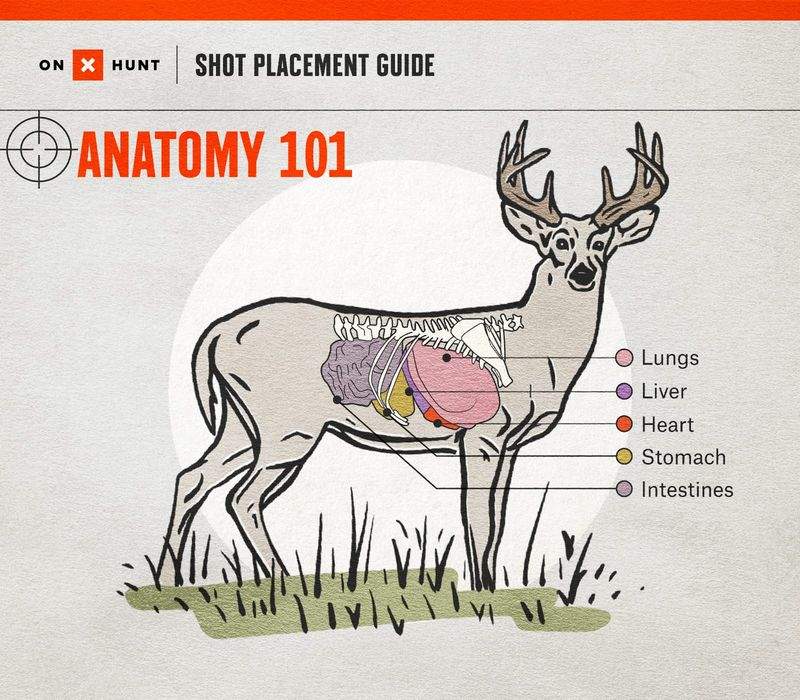
The heart sits just below and slightly forward of the lungs, in the lower third of the chest. A heart shot is decisive — the deer typically runs 50–75 yards before going down — but the heart is only the size of a large fist, making it a riskier aiming point than the full lung field. The liver sits directly behind the lungs; hits there are fatal but slow, requiring a 4–6 hour wait before tracking to avoid bumping a bedded, still-living deer.
Where you don’t want to hit: the stomach, intestines, or paunch. Gut shots can take 8–12 hours to prove fatal, and stomach contents contaminate the blood trail. Know where the organ cluster ends — roughly at the point where the belly line starts angling upward toward the hindquarters — and don’t shoot past that boundary.
Broadside Shot Placement — Your Highest-Percentage Opportunity
A deer standing perfectly broadside gives you the most forgiving shot geometry in bowhunting. You have the full front-to-back width of the chest cavity to work with. A mild left-right error still keeps the arrow in the heart-lung zone. That said, most newer bowhunters aim slightly too high and too far forward — just over the shoulder crease — and end up hitting spine or catching only the far edge of one lung.
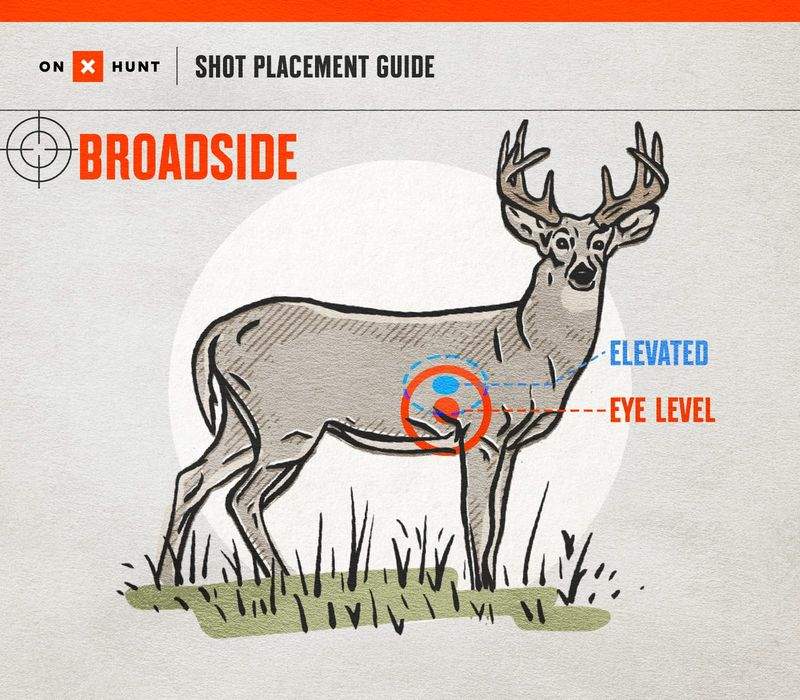
The correct aiming point on a broadside deer: 4 inches behind the front leg crease, one-third up from the belly line. That puts your broadhead directly in the heart-lung zone. Notice what the diagram above shows about treestand angle — at eye level you aim at one spot, but shooting down from an elevated stand requires a slightly higher aim point on the deer’s body. This trips up treestand hunters every single year.
One more thing most guides overlook: when a deer is standing in tall grass or brush, you can lose track of where the belly line actually is. Use the front leg as your vertical reference. The kill zone is framed by that leg on one side and the far ribcage edge on the other. If you can mentally draw that box, you know exactly where to put the pin.
Quartering-Away: The Angle That Wins Most Recoveries
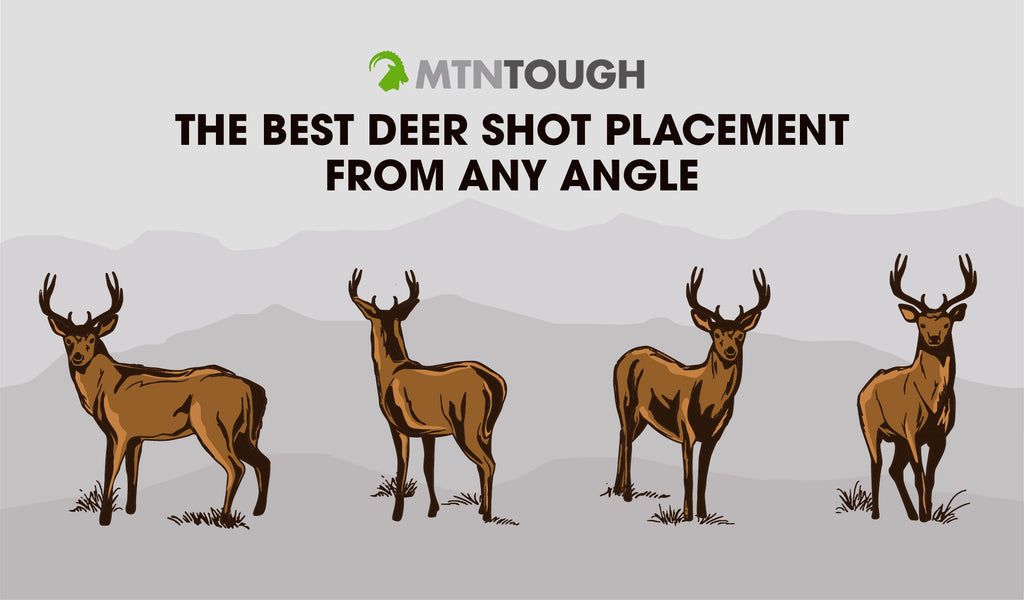
If the broadside shot is good, the quartering-away angle is better. The deer can’t see you draw because it’s facing partially away. The organ cluster is fully exposed. The arrow path through the body takes the longest possible route through the chest cavity. Many experienced bowhunters will pass on a broadside deer and wait 10 more seconds for it to take another step and quarter away.
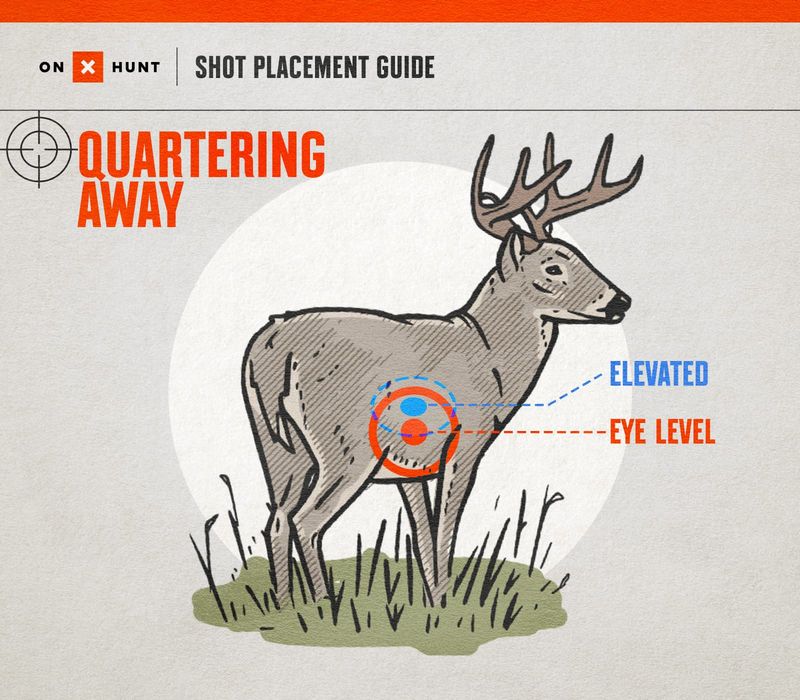
The technique here is thinking about the exit point before the entry point. Pick where you want the arrow to come out — ideally exiting through the off-shoulder or just behind it — then trace that line back through the body to find your aim point on the near side. This mental reversal drives the arrow through both lungs and often clips the heart on the way through. On a hard quartering-away angle where the deer is almost butt-to-you, aim farther back toward the last rib to achieve the correct angle through to the far shoulder.
The one mistake to guard against: aiming too far back on a quartering-away deer. Go too far rearward and you’re in the liver or gut, not the lungs. Keep that exit point visualization active. If you can’t trace a clean line from aim point to exit through the lung field, the angle is too steep — wait for the deer to change position. For how broadhead choice affects penetration at quartering angles, see our guide to fixed vs. mechanical broadheads.
Treestand Elevation Changes the Geometry
More bowhunters hunt from stands than from the ground, and that 15–25 feet of elevation introduces one of the most consistently misunderstood variables in shot execution. Shooting down at a steep angle is not the same as shooting level, even if the horizontal distance to the deer is identical.
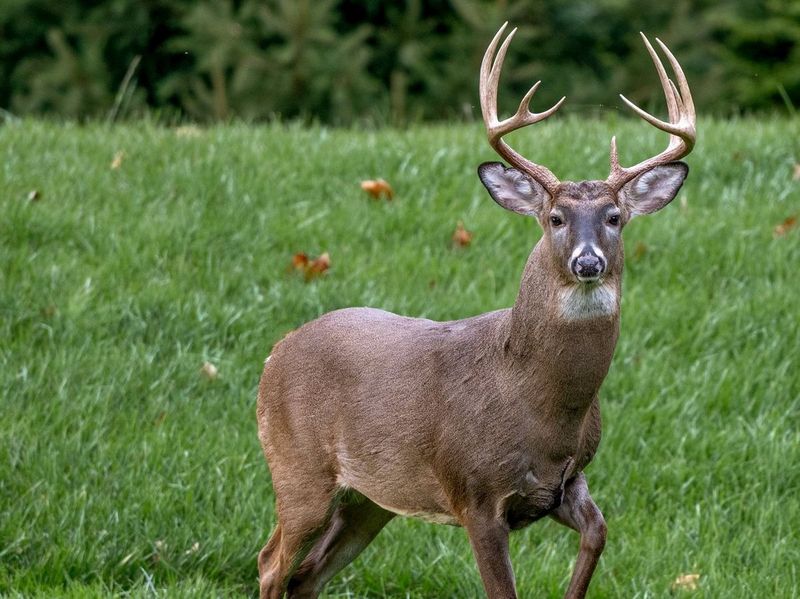
The problem: an arrow entering from above slices through the chest cavity at a diagonal. If you aim at the same spot you’d use for a flat ground shot, the arrow’s diagonal path often puts it too high in the chest, catching the spine or only the top of one lung. From a 20-foot stand at 15 yards, the shot angle is roughly 53 degrees. At that angle, a center-chest aim point frequently results in a high hit with no exit wound.
The fix most treestand hunters swear by is the “bend at the waist” technique: rather than bending your bow arm downward toward the deer, keep your bow arm in its natural position and hinge your entire torso toward the shot. This preserves your draw length and anchor point while naturally correcting for the downward angle. Combined with adjusting your aim point to the upper portion of the kill zone, it produces clean double-lung shots from virtually any stand height.
One hard rule many ignore: don’t take shots at deer directly beneath you. Beyond roughly 45 degrees of angle, exit wounds become nearly impossible — and exit wounds are what produce blood trails. Steep shots also reduce arrow penetration significantly. Let the deer walk out to at least 10–15 yards before releasing.
Quartering-Toward and Frontal Shots: Know When to Wait
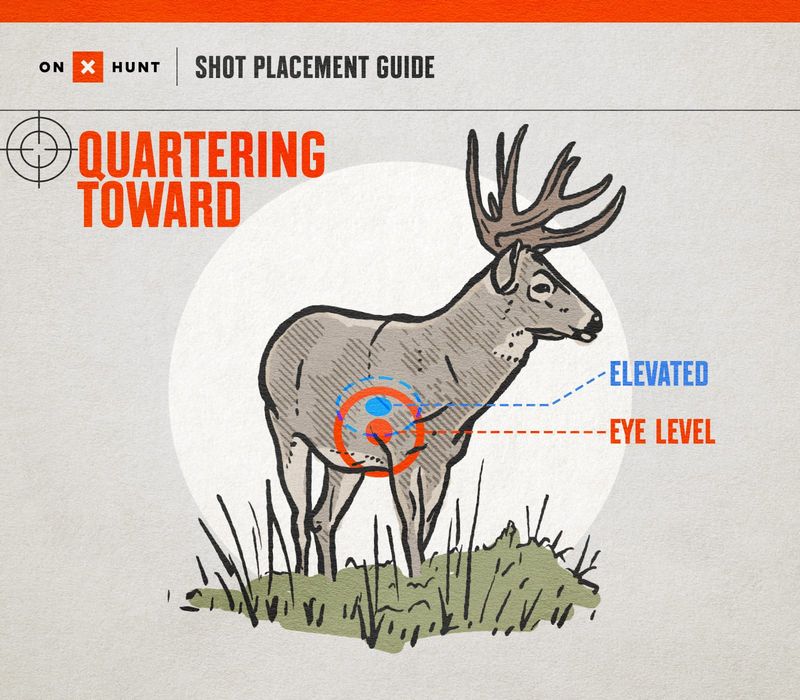
These two angles make experienced bowhunters put their bows down every time. The quartering-toward shot — deer angled toward you with the near shoulder partially blocking the chest — closes off 30–60% of the target zone with heavy bone and scapula. Your broadhead has to punch through that before it ever reaches lung tissue. Many arrows don’t, especially with mechanical heads that require force to open.
The frontal shot — deer staring straight at you — is more difficult still. The sternum and chest plate protect nearly everything. Some hunters target the base of the throat just above the sternum, but that requires sub-3-inch precision on an alert, ready-to-bolt animal with zero margin for error.
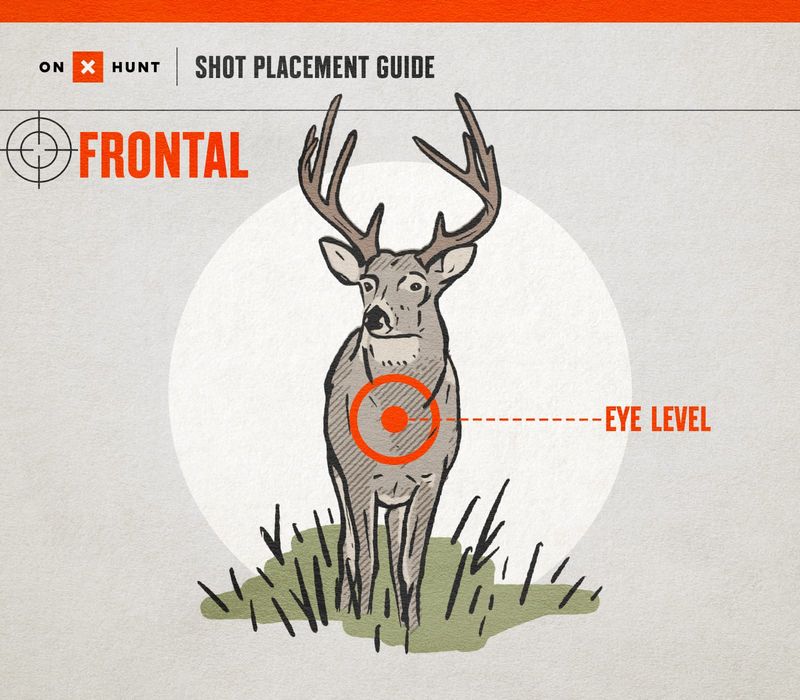
Even if your broadhead reaches the lungs on a quartering-toward or frontal shot, you’ve cut your exit-wound probability in half. No exit wound means little to no blood trail. A deer that runs 200 yards on a single-lung hit through heavy cover with no blood leaves almost no sign to follow. Deer almost never stop walking on their own; 10 seconds of patience usually rotates them into a broadside or quartering-away angle. Let the shot come to you.
How Long to Wait Before Tracking
The most expensive mistake in bowhunting comes after the shot: pushing the deer too soon. A bumped deer that’s been hit but not expired will run hard on adrenaline, blood vessels clamp under stress, and a strong trail turns cold within yards. The standard “wait 30 minutes” advice is well-intentioned but not calibrated to where you actually hit.
Here’s a breakdown by hit location:
- Double-lung — Bright red blood, often foamy. Wait 20–30 minutes. The deer usually piles up within 100 yards.
- Heart — Heavy bright blood, similar to lungs. Wait 20 minutes. These deer often kick hard on the shot and go down fast.
- Liver — Dark maroon, thick blood. Wait at least 4–6 hours. A liver-hit deer will bed down close and die there if left alone.
- Single lung — Light pink blood that may thin out quickly. Wait 2–3 hours minimum. Single-lung hits can push a deer 200+ yards.
- Gut shot — Brown or greenish blood with odor, possibly stomach contents on the arrow. Wait 8–12 hours, ideally overnight in cool weather.
Read the arrow the moment you find it. Blood color, hair type, and any stomach contents tell you exactly where the hit landed before you take a single step on the trail. That 60-second arrow analysis is worth two hours of confused searching later. Heavier arrows with more downrange momentum also produce better pass-throughs and cleaner blood trails — see our breakdown of hunting arrow weight if you’re still dialing in your setup before season.
These shot angles and recovery windows only matter if you’ve put in the work to execute them under pressure. Drilling varied-angle shots — especially from elevated platforms — is what separates a clean kill from a long tracking job. These archery practice drills you can run at home build the muscle memory before the season opens.
Sources
- onX Hunt — Deer Shot Placement Guide and Chart — Shot angle diagrams with elevated vs. eye-level aiming point comparisons
- Bowhunting.com — Shot Placement for Deer — Angle-by-angle breakdown with field guidance
- MTNTOUGH — The Best Deer Shot Placement from Any Angle — Recovery timing and shot angle analysis
- Realtree — Vital Shot Placement Tips for Bowhunters — Treestand angle considerations
- Mossy Oak — Every Shot Placement: Where to Shoot a Deer — Post-shot wait-time guidelines by hit location
