Archery Blog, Bow Tuning
Compound Bow Cam Timing: How to Check & Fix in 6 Steps
Jun
Cam timing is the single fix that turns an unexplained flier into a 3-inch group at 40 yards. On a compound bow, it means both cams (or the single cam plus the idler wheel) reach their stops at the same moment, so the string travels a straight, repeatable path on every shot. When timing slips by even an eighth of an inch of cable, paper tunes go sideways, broadheads plane, and pin floats double. This guide walks through what cam timing actually is, how to check it on dual-cam and single-cam rigs, and the six steps to bring a misaligned bow back into sync — without guessing.

What Cam Timing Is — and Why It Wrecks Accuracy
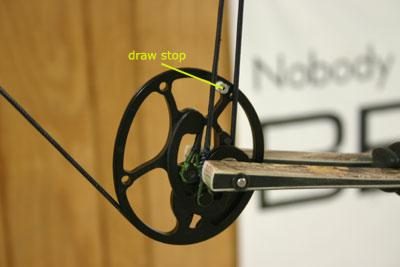
A compound bow stores energy in cables wrapped around the cams. As the archer draws, the cams rotate, the limbs flex, and at full draw the bow hits a hard wall — that’s the draw stop making contact. Cam timing is the question of when each cam reaches that wall. On a properly timed bow, both cams stop at exactly the same instant. On a poorly timed bow, one stops a hair before the other, and the bow releases energy unevenly.
The result is the kind of accuracy problem you can’t shoot your way out of. Paper tears that won’t close with rest adjustments. Vertical fliers that show up at random. Pin float that gets worse as you fatigue. The Lancaster Archery training team puts it bluntly: bad timing produces “tears that are unfixable by adjusting the arrow rest or nocking point.”[1] If you’ve been chasing your tune for weeks and nothing sticks, timing is almost always the reason.
Signs Your Cam Timing Has Drifted
Timing rarely fails all at once. It creeps. A new string settles, cables stretch, and over a few hundred shots the bow falls out of spec by a turn or two. The symptoms are easy to spot once you know what you’re looking for:
- Unexplained vertical paper tears that won’t respond to nocking-point adjustments
- Pin float that worsens noticeably when you’re tired or shooting in cold weather
- A “mushy” or inconsistent wall — sometimes hard, sometimes spongy
- Audible noise change: a healthy bow has one clean thud, a mistimed bow rattles or buzzes
- Broadhead flight that drifts away from your field-point group at 20+ yards
- Vertical group dispersion at distance — flat at 20, scattered at 40
If two or more of those show up, stop tuning the rest and check the cams first.
The Two Methods: Draw Board vs. Observer
There are exactly two ways to verify timing on a dual-cam bow. The first is the eyeball method — have a friend watch the draw stops while you slowly pull the bow back. The problem is that the stops engage in maybe a tenth of a second, and the human eye misses the lag. It works for catching gross timing problems, but it won’t catch the eighth-of-an-inch drift that ruins broadhead flight.
The second method is the draw board, and it’s the only honest answer. A draw board is a mechanical rig with a winch that pulls the bow back at a pace slow enough to see what’s happening. You can stop at any point in the draw cycle, take a photograph of the stops, and measure the gap if there is one. Commercial draw boards run $200–$400, but a workable DIY version comes together for under $50 with a 2×12, a trailer winch, and a paint roller to protect the riser.
The Bowhunter editorial team frames the core question this way: “Do the cams bisect each draw stop at the same time? If not, then some adjustment will be needed.”[2] Everything downstream of cam timing — paper tuning, broadhead alignment, sight tape calibration — assumes the answer is yes.
How to Check Single-Cam Timing
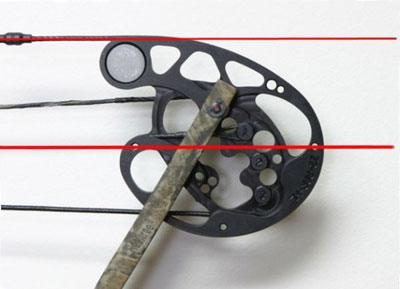
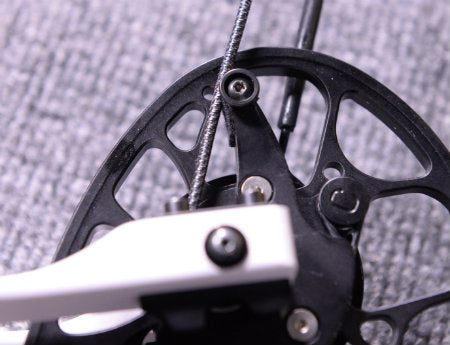
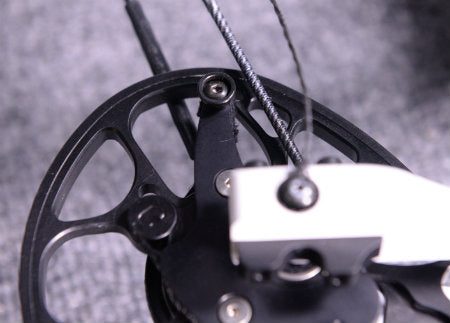
Single-cam (or solocam) bows are simpler. There’s one cam doing the work and an idler wheel on the opposite limb keeping the string aligned. Most single cams have a built-in timing mark — a small hole drilled through the cam wheel. When the bow is at brace and timed correctly, the cable runs perfectly centered through that hole.
Pull a level line of sight on the cam at brace. If the cable is biased toward the top edge of the hole, the cable is too long and needs a twist. If it’s biased toward the bottom, the cable is too short and needs an untwist. Each full twist on a typical compound cable changes the effective length by roughly 1/8 inch, so a hair’s breadth offset rarely needs more than a single twist to correct.
Once you’re close, draw the bow on a draw board and watch how the cable tracks. If the line drifts as the cam rotates, the idler wheel may be the problem instead, not the cam itself. That’s a yoke job — covered below.
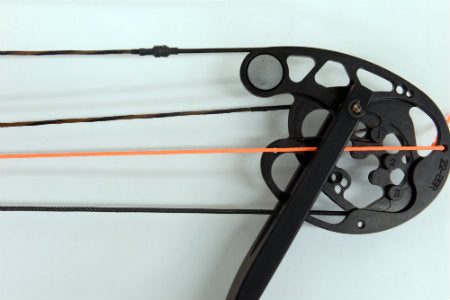
How to Check Dual-Cam Timing
Dual-cam bows have two identical cams on opposite limbs. Both cams have a draw stop — usually a peg or a rubber bumper — that contacts the cable (or in some designs, the limb itself) at the moment the bow reaches full draw. The check is straightforward: pull the bow on a draw board and watch which stop engages first.
Pull slowly and pause when the wall starts to firm up. If the top stop contacts first and the bottom is still a sliver short of engagement, the top cam is rotating ahead of the bottom. You’ll fix this by adding twists to the cable that drives the cam that hits first, which shortens that cable and forces its cam to rotate slightly less for the same string travel.
Here’s the rule worth memorizing: twist the cable feeding the cam that hits its stop first. The Elite Archery service team summarizes the same logic — adjust the cable that “lets the cam rotate” until both stops engage simultaneously.[3]
6 Steps to Fix Cam Timing
This is the practical sequence. Don’t skip the bow press step — adjusting cables under tension is how people lose fingers.
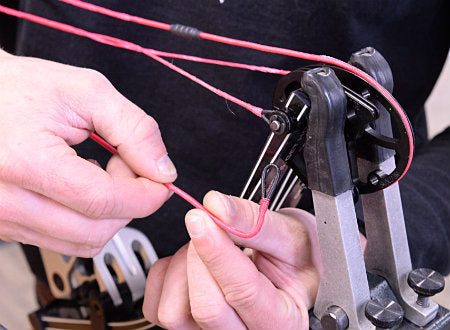
- Press the bow. Use a press that supports your bow’s limb geometry (parallel-limb bows need press fingers, not the older grip-style presses). Compress until the cables can be lifted off the cam without force.
- Identify the offender. On the draw board, note which cam hit its stop first. Mark it with a piece of tape so you don’t forget mid-job.
- Twist one full turn at a time. Lift the cable off its post, twist in the direction the cable already lays (so the existing serving stays tight), and reseat it. One twist equals roughly 1/8 inch of cable shortening on a typical 60–65 inch axle-to-axle bow.
- Release press, recheck. Bring the bow back to brace, walk it onto the draw board, and pull. Look at the stops again.
- Iterate. Most timing issues resolve in 1–3 cable twists. If you’re past five and not closer, stop and check for a stretched cable or a damaged module — twisting won’t save a worn-out string set.
- Reshoot paper. Once both stops engage together, paper-tune through 6 feet and 12 feet. Most timing-driven tears will close immediately. Any tear that persists is a rest, nock, or arrow-spine problem, not a cam problem.
Cam Lean and Yoke Tuning — Timing’s Cousin
Cam timing and cam lean get confused all the time, but they’re different problems with different fixes. Timing is about when the cam reaches its stop. Cam lean is about how the cam sits on the limb tip — whether it’s leaning sideways relative to the bowstring or sitting flat.
A cam that leans pulls the string off its natural plane, which causes left or right paper tears that look exactly like rest-alignment problems. The fix is yoke tuning: the yoke is the split end of the harness cable that anchors to both sides of the limb tip. Twist one leg of the yoke and untwist the other to pull the cam back into vertical alignment. Bowhunter’s tuning guide gives the precise recipe — for a persistent left tear, twist the left leg and untwist the right; reverse it for a right tear.[2]
Yoke tuning is iterative. One twist per side, recheck on paper, repeat. The good news: if your timing was already good, yoke adjustments are quick. The bad news: do yoke work after timing, never before. Adjusting a yoke on a mistimed bow gives you two moving variables at once and you’ll chase your tail.
Watch the Process in Action
If you’ve never seen a bow press and draw board used in sequence, the World Archery training channel walks through it on camera — useful for matching the written steps to what your hands should actually be doing.
How Often to Check Timing
A reasonable rhythm for a hunter or 3D shooter is to verify timing four times a year: at the start of indoor season, before broadhead tuning for hunting season, at the midpoint of the year, and after any string-and-cable replacement. Tournament shooters who put 300+ arrows a week through a bow should check monthly. The cables stretch fastest in the first 200 shots after install — anyone who buys a new bow should plan to retime at the 30-day mark.
The honest take here: most weekend shooters never check timing once between string replacements, and they wonder why their groups drift from spring to fall. Twenty minutes on a draw board, twice a year, prevents most of the “why is my bow shooting different now” questions that flood forums in November.
Cam timing also intersects directly with how let-off works on a compound bow — drifted timing changes the effective let-off curve and makes the wall feel mushy. If you’ve been chasing a paper tune that won’t close, the paper tuning chart covers what each tear shape means after timing is verified. And timing belongs on every long-term care list, which is why it’s baked into the compound bow maintenance schedule alongside string waxing and limb inspection.

When to Take the Bow to a Shop
There’s no shame in handing a timing job to a pro shop. If you don’t own a press, the math doesn’t work — a $30 timing tune at a shop is cheaper than a $250 entry-level press for a one-off fix. If your bow uses an unusual cam system (hybrid cams with twin modules, the Bowtech Binary system, or Mathews’ specific Crosscentric setups), the procedure deviates from generic instructions and the manufacturer’s service manual becomes the authority.
The shop visit also makes sense the first time. Watch a bow tech run through the process on your bow, ask which way the cables twist, and confirm how many twists they needed. After one observation session, the DIY version becomes obvious — and you stop scheduling appointments every time your bow drifts.
The Tuning Order That Saves Hours
Most tuning frustration comes from doing the steps in the wrong order. The sequence that works on every compound bow ever made looks like this: set draw length, set draw weight, verify cam timing, set cam lean via yoke tuning, install nocking point and rest, paper tune at 6 feet, bare-shaft tune at 20 yards, sight-tape and broadhead tune. Skip a step or reorder it and you spend hours adjusting downstream variables that won’t hold because the foundation isn’t set.
So if you take one thing from this guide, make it this: the next time your groups start opening up, check timing before you touch the rest, the sight, or the arrows. Twenty minutes on a draw board has fixed more accuracy problems than every aftermarket gadget combined.
Sources
- Lancaster Archery — What Archers Need to Know About Cam Timing — Training resource on single- and dual-cam timing methods, draw board use, and adjustment process.
- Bowhunter Magazine — How to Fine-Tune Your Bow’s Cam System — Editorial guide covering cam synchronization, cam lean, and yoke tuning steps for compound bows.
- Elite Archery — Pro Tips: Adjusting Timing — Manufacturer service note on identifying and correcting cam timing with cable twists.