Archery Blog
Paper Tuning a Bow: 7-Step Guide to Perfect Arrow Flight
Jun
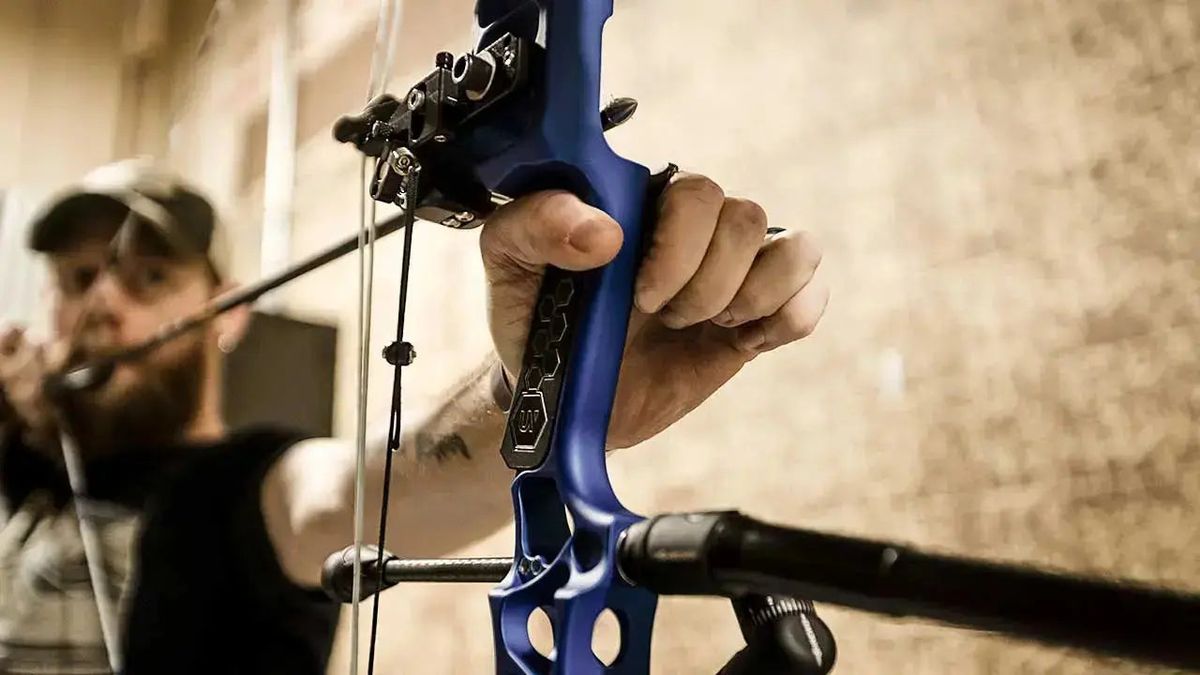
Paper tuning a bow shows exactly what’s wrong with your arrow flight in 30 seconds. Shoot one arrow through a sheet of newsprint at 6 feet, look at the tear, and the paper tells you whether your rest is high, your nock is twisted, or your cam is leaning. Skip this step and broadheads will plane on you at 40 yards — a problem that costs deer every fall.
The pros at Lancaster Archery paper tune every bow they sell because the test exposes setup errors a chronograph can’t catch. You don’t need a pro shop, a draw board, or $400 of tools to do it at home. You need a frame, some paper, and the will to follow the tear back to its source.
What Paper Tuning a Bow Actually Tells You
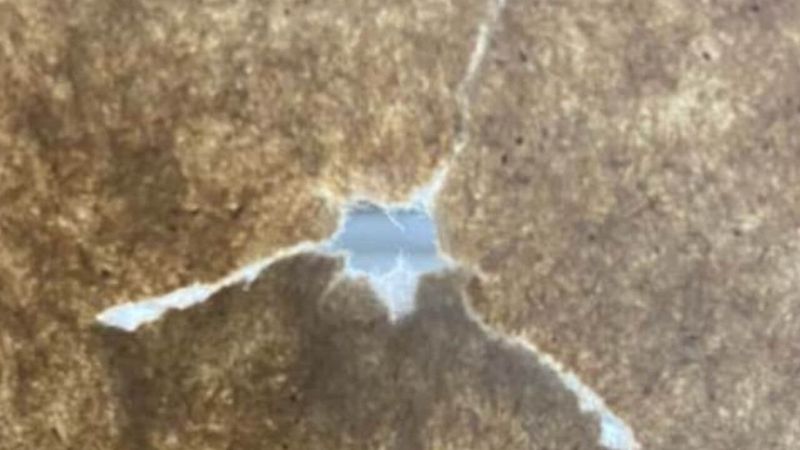
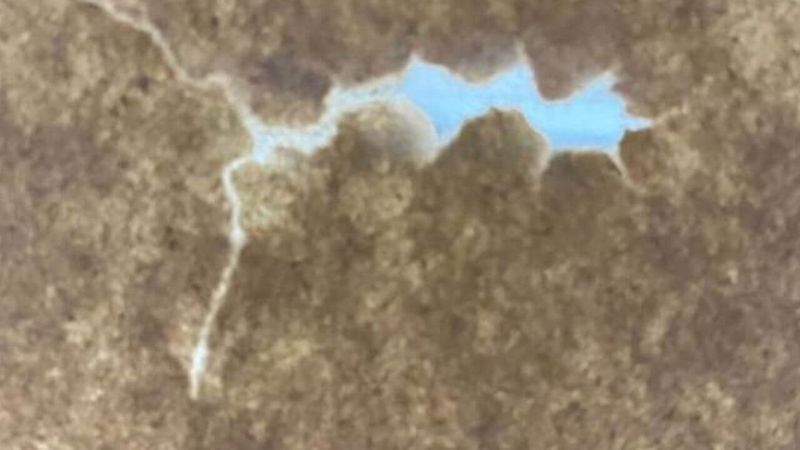
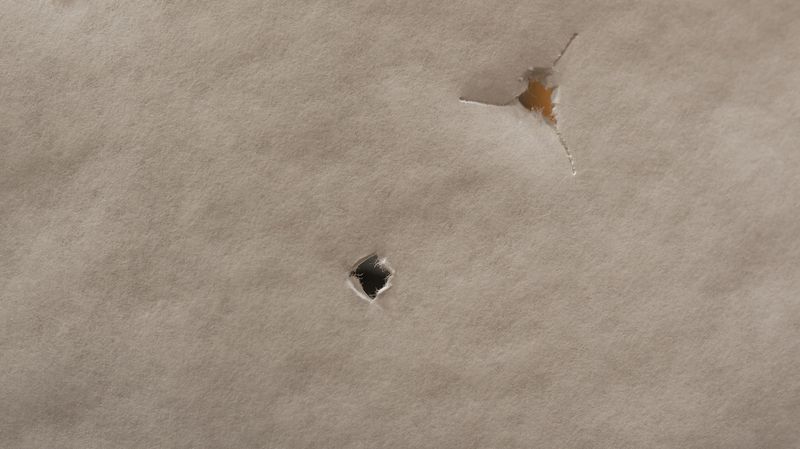
A tuned bow produces a clean tear shaped like a star — three small slits radiating from a round hole. That’s a bullet hole, and it means the arrow left the rest cleanly with its nock and point traveling on the same vector. Anything else is a diagnosis: an offset tail means the rest pushed the back of the arrow sideways, a vertical tail means the nock height is wrong, and a kiting pattern means the arrow is fishtailing through the paper because something in the launch geometry is fighting it.
The reason this works at 4 to 6 feet and not 20 yards is simple — arrows correct themselves in flight. Fletching grabs air, the shaft straightens out, and by 15 yards even an ugly launch looks fine on a target face. Paper catches the arrow before it has time to lie to you. That’s why every serious compound shooter paper tunes after any change to draw weight, arrow rest, nocking point, or arrow build.
Setting Up the Paper Tuner Rack
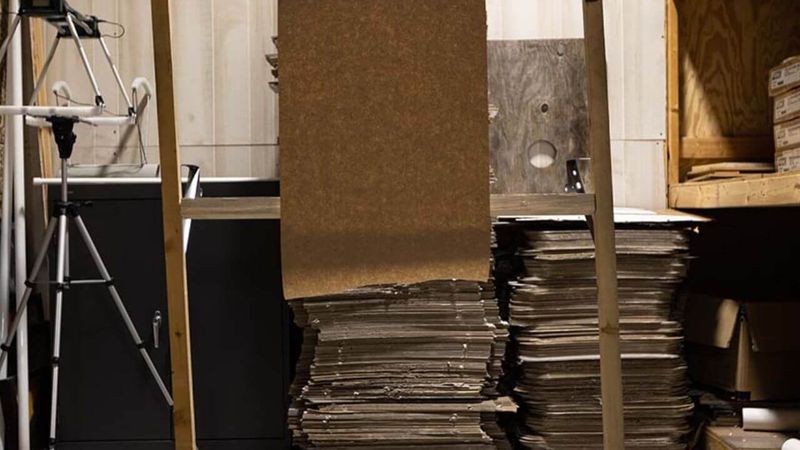
Build a rack from two 2×2 uprights spaced about 30 inches apart and held to a horizontal crossbar with clamps. Hang a sheet of brown craft paper or newsprint so the center of the paper sits at your shoulder height — roughly where your arrow lives at full draw. Place a target butt three to six feet behind the rack to catch the arrow.
Lighting matters. The tear pattern can be hard to read on dim brown paper if you’re shooting from the shadows. Put a single overhead bulb directly above the paper or shoot toward a window — the tear’s edges show up against bright backlight. Mark each tear with a pencil and the bow configuration that caused it. You’ll want that record when you start chasing a stubborn nock-left.
How to Read Every Paper Tear
The four tears you’ll see most often each point to a single mechanical cause. Memorize them in this order and you’ll know which knob to turn before the arrow stops vibrating.
Perfect bullet hole: a clean round point hole with three small fletching slits. Bow is tuned.
Nock high: the fletching tear sits above the point hole. The nock end of the arrow is moving down through the paper, meaning the rest is too low or the nocking point is too high.

Nock low: the fletching tear sits below the point hole. Drop the nocking point or raise the rest a sixteenth of an inch and shoot again.
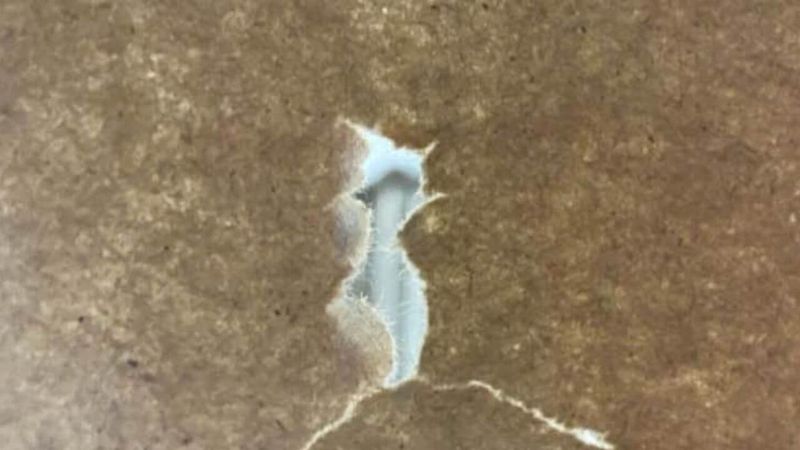
Nock left or nock right: the fletching tear pulls horizontally off the point hole. For a right-handed shooter, nock left usually means the rest needs to move right (toward the riser); nock right means move the rest left. Reverse for left-handed shooters. Make changes in 1/32-inch increments — the rest is more sensitive than it looks.

Step-by-Step Process to Paper Tune a Bow
Run the process in this order and you’ll never chase your tail. The biggest mistake new tuners make is fixing horizontal before vertical — every horizontal adjustment slightly shifts the vertical tear, and you’ll loop forever.
- Set centershot at the manufacturer’s spec (typically 13/16″ from the riser face).
- Tie or set the nocking point 1/8″ above square as a starting position.
- Shoot one fletched arrow at the paper from six feet, square to the rack.
- Diagnose vertical tear first. Adjust the rest or nock point until the fletching tears horizontally through the point hole.
- Diagnose horizontal tear. Move the rest left or right in 1/32″ steps.
- Walk back to 10 feet and re-shoot. If the bullet hole stays clean, walk to 18 feet.
- If the tear cleans up at six feet but reappears at 18 feet, you have a cam lean or arrow spine issue — not a rest issue.
Always shoot at least three arrows at the same paper before declaring a tune. A single bad release can fake any tear pattern in the book.
Adjusting Rest, Nock Point, and Cam Lean
Rest height moves in 1/32-inch increments. Most micro-adjust rests have hash marks — use them. If your rest doesn’t have detents, mark the housing with a paint pen before each change so you can find your way back to a previous position when a “fix” actually makes things worse.
Nocking point is almost always adjusted by sliding a brass nock locator up or down the serving with nock pliers. If your bow uses a tied-in D-loop, the loop itself sets the nock height — burn off the old serving knots, retie the loop a hair higher or lower, and reshoot. Don’t pinch the nock between the loop and a fixed knot; the arrow will release inconsistently.
Cam lean is the silent killer. If you’ve maxed out rest travel and the horizontal tear refuses to close, the top cam is probably twisted relative to the string plane. Fix it by twisting the yoke or shimming the cam — a job best done on a draw board, not by guess. For a deeper walk through cam timing and yoke adjustment, our compound bow tuning guide on cam timing, lean, and rest setup covers the full sequence.
What Kind of Paper Should You Use?
Newsprint and brown craft paper are the standards because they tear cleanly without resisting the fletching. Office printer paper is too dense — it tears in jagged patterns that mimic nock movement that isn’t there. Heavy butcher paper has the opposite problem; it grabs the fletching and exaggerates every tail, making a clean shot look terrible.
If you have to improvise, a single sheet of newspaper folded once is close enough. Avoid anything glossy, anything coated, and anything with staples or seams in the shot path. The cheapest 24″ x 36″ newsprint pads from a craft store hold 100 sheets for about $12 and will tune a dozen bows.
Distance for Paper Tuning a Compound Bow
Start at six feet, finish at 18. The short distance shows you raw nock travel before the arrow has time to correct. The longer distance proves the arrow stays clean once fletching engages. If your bow shoots a perfect bullet hole at six feet but fishtails at 18, the arrow is underspined or the broadheads will be unpredictable.
Some pro shops paper tune only at 6 feet, which is fine for hunting setups using mechanical broadheads. Target shooters and fixed-blade hunters should always confirm the tear at 18 feet — that’s where a marginal arrow spine reveals itself before you waste a fletching job.
Should You Paper Tune Your Bow?
Yes, but it’s one diagnostic in a stack. Paper tuning answers the question “is the arrow leaving the bow straight?” and nothing else. It won’t tell you if your sight is calibrated, if your peep is rotating, or if your release timing is consistent at full draw. A bow that shoots a perfect bullet hole at six feet can still throw fliers at 50 yards if the shooter’s grip is changing under load.
The honest answer is that bare shaft tuning is more sensitive than paper, and broadhead tuning is the only test that proves your hunting setup. Paper tuning is fast, cheap, and visual — it gets you 80% of the way to a tuned bow, and that’s enough for most archers most of the time.
Common Mistakes That Wreck Your Tear
Most bad paper tunes aren’t bow problems — they’re shooter problems. Watch for these before you blame the bow.
- Torquing the grip. A relaxed open hand should be the contact point. Squeeze the riser and you’ll throw nock-left tears all day.
- Punching the trigger. A sudden index release jolts the bow off-axis at launch. Use a back-tension release or focus on a clean surprise break.
- Shooting from the wrong distance. Get closer than four feet and the fletching may not have cleared the rest when it hits the paper.
- Inconsistent anchor. If your peep, kisser, and corner-of-mouth anchor shift between shots, the tear shifts with them.
- Stale arrows. A bent shaft, a cracked nock, or a fletching that’s lifted at the leading edge will produce phantom tears that no rest adjustment fixes.
The fastest sanity check is to hand the bow to a known clean shooter. If their tear looks different from yours, the bow is fine and your form is the variable.
After Paper Tuning: Bare Shaft and Broadhead Tuning
Once you can shoot a clean bullet hole at 18 feet, move outside. Shoot a single bare shaft at a foam target from 20 yards and compare the point of impact to a fletched arrow shot at the same dot. If the bare shaft hits within two inches of the fletched group, the bow is tuned to the arrow. If it drifts more than four inches in any direction, your fletching is masking a tuning problem the paper missed.
Broadhead tuning is the final test. Field points and broadheads should hit the same spot at 20 and 30 yards. If they don’t, the broadhead is amplifying a launch error too small to see on paper. The arrow spine, the broadhead alignment, or the cam lean is the culprit — not the rest. The matched-arrow approach in our arrow spine chart guide covers the spine selection side of this problem, and our arrow rest types breakdown helps if you’re considering a rest swap.
Watch a Paper Tuning Walkthrough
Petersen’s Bowhunting put together a short demonstration that covers the rack setup and tear diagnosis from a pro shop perspective. Watch it before your first session — seeing a real tear on real paper makes the diagnostics click faster than any diagram.
The Bottom Line
The bow doesn’t lie. Tune your equipment to the arrow it’s actually shooting, write down every adjustment, and verify with a bare shaft before you trust the setup at 40 yards. A paper tuner takes 20 minutes to build and pays for itself the first time you catch a nock-left tear before opening day instead of after a missed shot at a velvet buck.
Sources
- Easton Arrow Tuning and Maintenance Guide — Easton Archery’s reference PDF on paper, bare shaft, and broadhead tuning sequences.
- Step-By-Step Bow Tuning for Beginners — Bowhunter Magazine’s diagnostic chart for vertical and horizontal tears.
- How to Tune a Compound Bow — GoHunt’s full tune workflow including cam timing and rest setup.
- Paper Tuning Your Compound Bow — Extreme Outfitters’ pro shop guide with detailed tear pattern photos.