
Archery Blog
Deer Shot Placement for Bowhunting: 5 Shot Angles Ranked
Jul
The kill zone on a whitetail deer is roughly the size of an 8-inch paper plate. Arrows inside that zone produce a clean, ethical harvest in under a minute. Arrows outside it — even by three inches in the wrong direction — produce a wounded deer, a sparse blood trail, and hours of searching through dark timber. Shot placement matters more with a bow than with a rifle, for one simple reason: a broadhead kills through hemorrhage, not hydrostatic shock. Precision cuts to major blood vessels and organs do the work, and that only happens when your arrow reaches the right anatomy.
Why Shot Placement Is Different With a Bow
A centerfire rifle bullet creates a pressure wave through tissue that kills far beyond the bullet path itself. A broadhead doesn’t have that margin. It kills through clean cuts to the heart, lungs, and associated blood vessels — and those cuts only happen when the arrow actually reaches those organs. That distinction changes where you aim, what shot angles you accept, and how far you’re willing to shoot.
At 20 yards or less with a fast compound bow, deer don’t have enough time to react to the sound of the shot before the arrow arrives. The reaction window grows significantly past 30 yards, where a deer can drop its entire body 8–10 inches before impact — what hunters call jumping the string. A shot aimed at mid-chest can arrive at belly level. This is why experienced bowhunters cap their shots at self-imposed distance limits and why shot angle is the variable that determines how much margin you actually have.
One more factor separates bows from rifles on angled shots: a bullet punches through bone and continues toward the vitals. An arrow deflects. Hit the shoulder blade and your arrow goes sideways, not through. The practical result is that marginal shot angles that might work with a rifle are genuine no-shoot situations for a bowhunter.
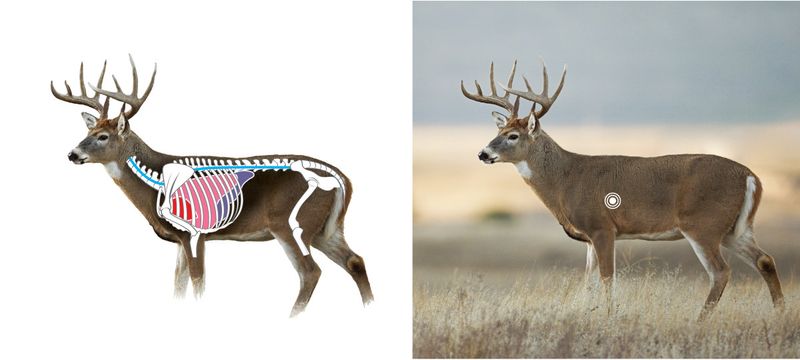
Heart and lungs fill the lower two-thirds of the chest cavity. Both must be accessible through your arrow’s flight path before you take the shot.
The Kill Zone: Heart, Lungs, and the 8-Inch Window
The heart sits in the lower center of the chest cavity, just above the brisket. Both lungs flank it and extend upward through most of the rib cage. Together these organs present a target approximately 8–10 inches wide from a broadside angle, per onX Hunt’s shot placement research. That’s your entire window — not the deer’s side, not its chest generally, but that specific cluster of vital tissue.
The standard aiming reference: three to five inches behind the front leg crease, at one-third of the body’s height up from the belly line. Pick a specific patch of hair, not a general zone. Vague aiming produces vague arrow placement. If you can’t identify a precise point on the deer’s hide to send your arrow through, you’re not ready to shoot.
One anatomy detail that catches new hunters: the front leg can physically shield the lower heart when it’s positioned forward. If the leg is directly over your aiming point, wait for the next step. As the leg draws back, the path to the vitals opens. That two-second wait is worth it every time.
Shot Angle 1: Broadside — The Foundation of Ethical Bowhunting
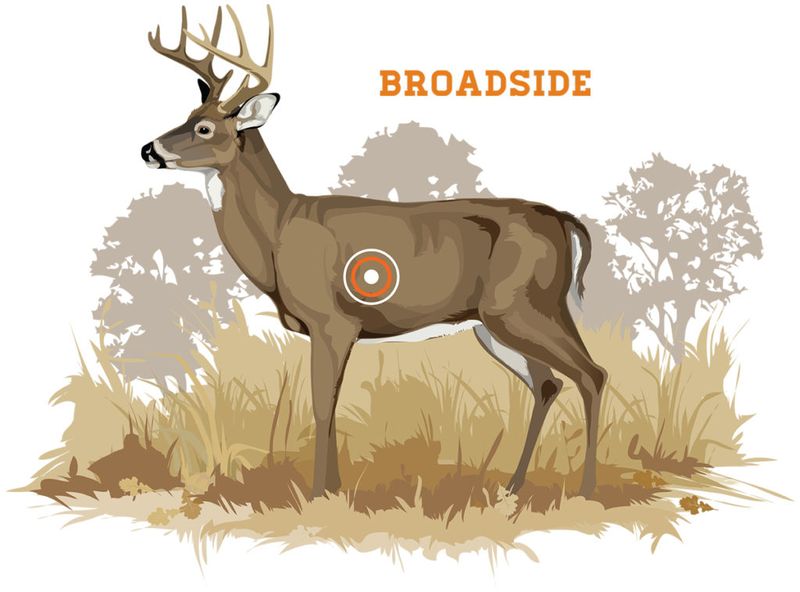
Broadside: both lungs fully exposed, shoulder blade out of the path, four inches of error margin in every direction still connects with vital tissue.
A deer standing directly broadside presents the largest possible kill zone. Both lungs are directly in your arrow’s path. The shoulder blade is clear. There’s margin for a four-inch error in any direction and you still contact vital tissue. This is the angle every bowhunter learns first — and the one experienced hunters wait for when conditions are marginal.
The most common mistake on a broadside shot is aiming too far forward, right at the front leg or shoulder. Hunters instinctively aim at the largest muscle mass they can see. That mass is the shoulder, which sits in front of the lung field. Keep your pin clearly behind the leg crease. If the front leg is covering your intended aiming point, wait for it to step forward.
One refinement worth noting: when you’re above a deer — shooting from a treestand at steep angles — aim slightly lower than you normally would. The downward angle shifts the arrow’s path through the chest cavity. What would be a double-lung hit on a flat ground shot can become a single-lung strike from 20 feet up if you don’t compensate.
Shot Angle 2: Quartering-Away — Often Better Than Broadside
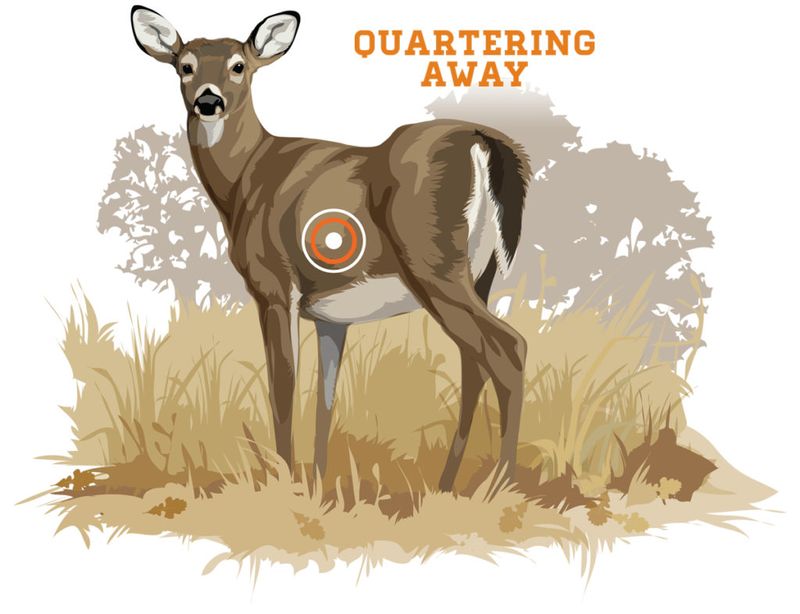
Quartering-away: aim for the far-side shoulder as your exit point. The near shoulder blade swings completely clear of the vital path.
Many experienced bowhunters prefer a mild quartering-away angle over a perfect broadside. Here’s why: when a deer quarters away, the near shoulder blade rotates out of the picture entirely. Your arrow enters behind the ribs and travels diagonally through the chest cavity — often clipping both lungs and passing through or past the heart on the way out. The diagonal path means more organ contact than a straight broadside shot, which typically produces excellent blood trails.
The aiming approach changes compared to broadside. Don’t aim behind the near shoulder — aim at the exit point on the far side. Visualize where you want the broadhead to emerge (roughly the off-shoulder area) and then identify the near-side entry point that puts the arrow on that diagonal trajectory. On a mild quarter, this means aiming slightly farther back than you would broadside. On a steep angle, you’re targeting near the last rib.
The one scenario to pass on: a deer that’s nearly straight-away. Once the angle is that steep, the entry window between the near hip and the paunch becomes too narrow. The aiming margin disappears and the paunch becomes the primary risk. Wait for the deer to reposition, or pass.
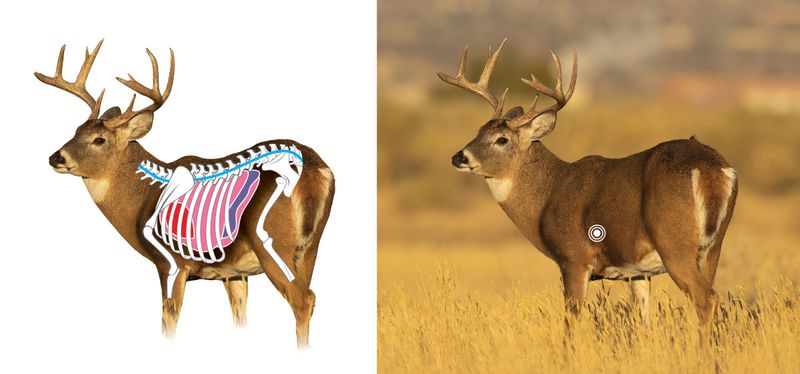
The quartering-away path gives the arrow maximum contact with the chest cavity — often more damage than a straight broadside hit.
Shot Angle 3: Quartering-Toward — Only in the Right Conditions
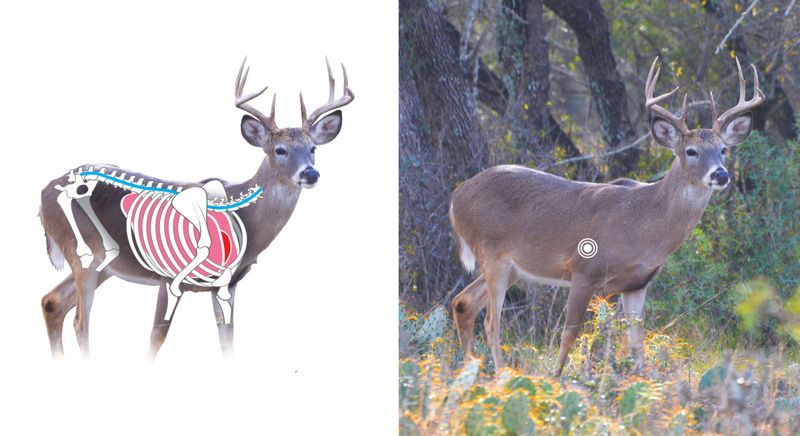
Quartering-toward: the near shoulder now shields most of the vital zone. Only a precise entry through the armpit crease reaches both lungs.
A mild quartering-toward angle is doable with a bow, but the margin for error is thin enough that most hunters should honestly assess whether to wait for a better angle instead. The near shoulder blade now occupies the space in front of the chest cavity. To reach the lungs, your arrow must thread through the armpit — the gap between the front leg and the body — and angle toward the far-side lung.
The technique: aim at the near-side front leg where it meets the body, threading behind the shoulder blade. A well-placed arrow punches through into the chest. A few inches off toward the shoulder means hitting the scapula, which can deflect an arrow sideways rather than letting it continue into the vitals. Unlike a bullet that pushes through bone, an arrow deflects off dense structural bone. That deflection often sends the arrow into the abdomen or exits through muscle without reaching a lung.
The honest rule for this angle: only take it when you’re within 20 yards, on level ground, and fully confident in your yardage. Any doubt on any of those variables means waiting for the deer to move. For more on how broadhead design affects penetration through bone, see our breakdown of fixed vs mechanical broadheads.
Shot Angle 4: Head-On — Never
A deer facing you directly presents a target roughly the size of a softball: the narrow chest cavity between the two front legs, behind the brisket. Even if your arrow were to thread perfectly through that gap, the sternum and front leg bones create a structural gauntlet that absorbs far more force than ribs. Penetration through the sternum is inconsistent even with fixed-blade broadheads at hunting draw weights.
Hunters who take head-on shots typically produce gut shots or single-lung hits — both of which result in wounded deer that travel long distances before bedding down. Gut-shot deer may produce no visible blood trail for the first 100 yards. The only correct response to a deer standing directly toward you is to wait without moving until it turns.
Shot Angle 5: Straight-Away — Skip It
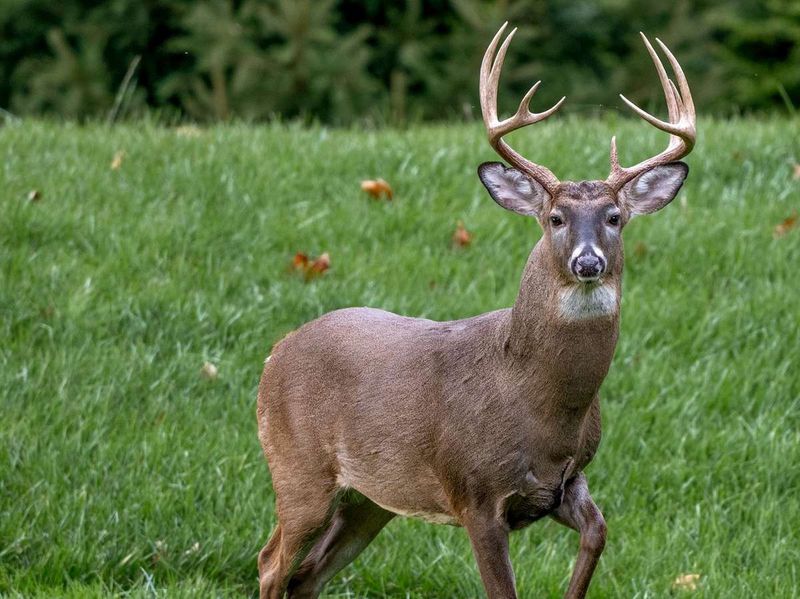
Whether facing toward or walking directly away, the pelvis, spine, and paunch stand between your broadhead and the vitals.
The straight-away shot — sometimes called the Texas heart shot — has killed deer, but it’s not an ethical choice for a bow. An arrow entering through the hindquarters must travel through the abdominal cavity to reach the lungs. Along that path, it almost always passes through the paunch and large intestine first. Paunch-hit deer can travel a mile before they stop, produce almost no external blood, and are among the most difficult recoveries in bowhunting.
Abdominal hits often produce little external bleeding because the wound channel is deep and internal. You end up tracking by instinct and sign rather than blood, which in heavy cover or low light means a high probability of losing the deer. Pass on this angle every time. The few seconds of patience required to wait for the deer to walk past and present a quartering-away angle is always the better call.
How Distance and Treestand Height Shift Your Window
Shot placement math changes with distance and elevation. At 15 yards on flat ground, your arrow arrives before the deer can drop its body to avoid it. At 35 yards, string jump is a genuine risk — a deer that hears the shot can drop 8–10 inches before your arrow arrives, turning a chest hit into a belly hit. Experienced bowhunters who shoot deer consistently at 40+ yards have earned that range through years of practice at those distances with their specific setup, not by trusting that it’s “close enough.”
From a treestand, steep downward angles require you to aim lower than you would on flat ground. A 20-foot treestand at 15 yards produces a downward angle that can shift a center-chest shot into a high single-lung hit. Compensate by aiming at the lower edge of the kill zone — the heart — rather than the center of the lungs. This is one of the primary reasons treestand hunters should practice from their actual stand height before season, not just from ground level.
For a complete pre-season treestand setup walkthrough including shooting lane configuration, see our 7-step tree stand setup guide.
Building the Readiness Standard Before Season
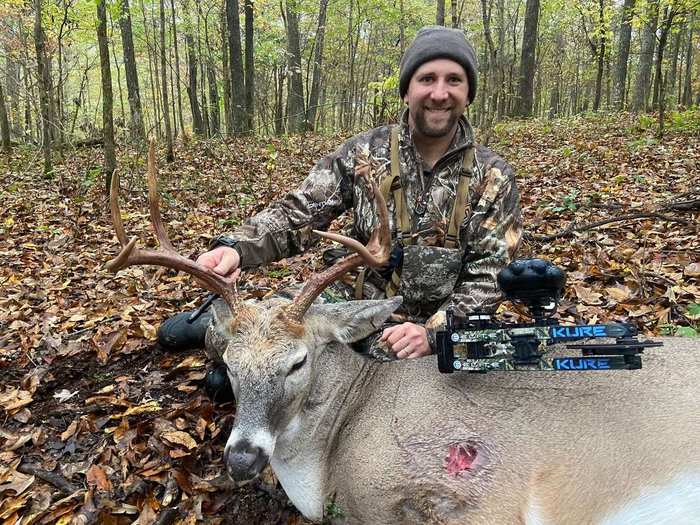
A clean harvest at the end of the season is the result of hundreds of repetitions at realistic distances before it.
The readiness standard most serious bowhunters use is this: group five arrows inside an 8-inch circle at your maximum intended hunting distance, five times in a row, from your hunting setup. That circle represents a deer’s vital zone. If you’re hitting 6-inch groups at 30 yards on a calm day from flat ground, your real-world hunting group at 30 yards — with adrenaline, cold hands, awkward positions, and a treestand harness — is probably 10 inches. That puts the near-miss shots outside the vital zone.
Practice matters more than equipment at this stage. A well-tuned mid-range compound bow shooting a properly spined arrow with a sharp broadhead will put down deer reliably. What won’t work is a premium bow shot by a hunter who hasn’t practiced from field positions. See our bowhunting beginner’s guide for full equipment setup and practice structure heading into your first season. And once you’re dialed in, make sure your broadheads are tuned to match your field points — our broadhead tuning guide covers the full process.
The deer that escaped wounded didn’t make a decision. The hunter did — by taking a shot before the angle was right. Broadside and quartering-away are the shots worth taking. Everything else is a judgment call that usually resolves in favor of waiting. That patience is the most important skill a bowhunter develops, and it’s the one that separates reliable success from expensive misses.
Sources
- onX Hunt — Where to Shoot a Deer: Ultimate Shot Placement Guide & Chart — Vital zone sizing and aiming point data, including the 8-inch paper plate benchmark
- Bowhunter Magazine — Where to Shoot a Deer: Bowhunting Shot Placement — Shot angle analysis and aiming diagrams by Mike Del Rizzo
- Grand View Outdoors — Where to Shoot a Deer — Shot placement diagrams by Ryan Kirby / Archery Trade Association
- MeatEater Wired to Hunt — Where to Shoot a Deer — Anatomy overlays and angle diagrams
- Bowhunters United — Bowhunting Ethics: Ensuring Humane Harvests — Recovery rate data and ethical shot framework
- Realtree — The Best Shot Placement on Deer — Field photographs and real-hunt angle analysis
